CARTOON STUDIO
Cartoon Studio / Update #7 / Dec 20th
Cartoon Studio concluded last session and with it X took with him a very useful tool and the illustrative processes he learned.
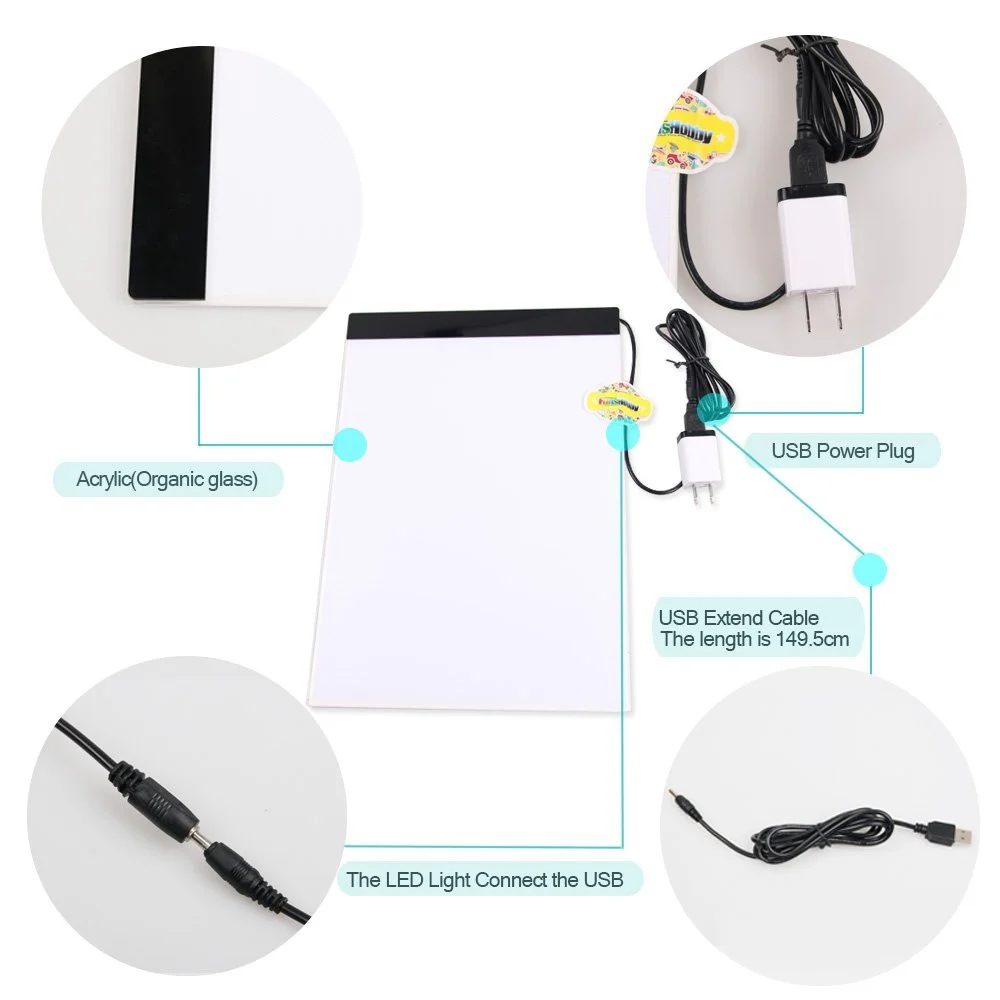
Light Board
At first, I wanted him to build his own light box, for the experience, but after trying my best to find materials to build an inexpensive and portable version, I found them to be left wanting. For one thing, the plastic box’s lid kept popping off, and the lights simply were not bright enough.
No worries. I did some searching and was excited to find this light board that is pretty much exactly what I wanted for him. It’s a great product and I’m sure he will find good uses for it in the future.


Illustrative Processes
I couldn’t be happier with his final drawings and the focus he put into completing them. He put into action everything that I have been teaching him. Not just each of the techniques and concepts, but also mentally:
- Slowing down
- Asking questions
- Taking a minute or two break if you get stuck
When he comes in and is in the mindset of being focused, he simply does a great job.
Conclusion
Some courses are focused on producing several finished artworks and others are focused on learning a concept. Cartoon Studio was a concept focused course. If he learned the concepts then he can use them to make as many illustrations as he wants. From the final drawings he completed, it showed me that he definitely took it all in.
The techniques and processes can be seen in the final drawings:


1) Sketching
- Large shapes first
- Line Association
- details last
2) Inking
- Can make small fixes
- Good line quality
- No furry lines
- Varied line quality (thick and/or thin)
3) Coloring
- Choose appropriate media
(colored pencils, markers, etc.)
- Decide appropriate Color System
- Avoid using pure black for shadows
Cartoon Studio / Update #6 / Dec12th
The last concept we have been studying is Color Systems.
Coloring is the final step in making a well done finished illustration.
But, it’s not as simple as just filling in the lines.
Many illustrators use simple color systems to create more vibrant and appealing drawings.
Rather than just using grays and blacks for shadows, which tends to make characters look dull, a color system is picking the main color for an area, like the skin of the character, and using a limited number of shades and tones of the main color for shadows and highlights,
Examples:
LIGHT BOX
Illustrators and animators use light boxes primarily during the inking process, when they have a finished sketch but need to ink over it to finalize the drawing. Just like holding a paper over a window, light boxes make it super easy to trace over your previous work.
I know I used the “t” word (trace), but it’s your own artwork and it’s just part of the illustrative process.
We started building our own light box. There are hundreds of videos online about how to build one. Most of them are geared towards people who have their own wood shop, so I looked around to find a more accessible approach. However you build one, here is a general idea about building one:
The final project will be using the finished light box to create at least two finalized illustrations. Can't wait to see his finished artwork!
Cartoon Studio / Update #5 / Nov28th
Inking & Line Quality
Up to this point, the focus has been on building a sketch. But how to do you go from a sketch to a finished clean drawing? That next step after sketching that will get you closer is called Inking.
Inking
Like it sounds, inking traditionally uses black ink, but it doesn't matter what you use as long as you remember that inking = black. In the illustrative process, whether creating cartoon strips, comic books, graphic novels, or just about anything else related to that, inking is essentially tracing over a sketch, using black ink to clean up the sketch and make it presentable for coloring and then publishing. Many publications stop at inking and don't bother with coloring, since black and white looks good on it's own (which also saves money on coloring and production time).
Watch the video below. Skip to 36:14 if it doesn't start playing at that time. You can ignore what he's saying if you want. The important thing is to watch as he first makes a sketch and then inks over it. He's using a computer, but it's the same effect. From about 44:51 to the end, he just spends some time tweaking it to make it look even better. You can skim through that to the last few seconds when it's done.
IMPORTANT NOTE: Inking is not sketching with a pen. Your goal is to make nice clean lines (unless you're going for a messy style, but not in this class yet), which brings us back to a lesson that we learned in last semester's ICND (Illustrative Character & Narrative Design) called Line Quality.
Line Quality
Line Quality is the intentional use of different line textures and styles to create a specific effect (like using smooth soft lines or harsh bold lines, etc.) To ink properly, and to just draw better in general, you have to learn to control your hands enough to make nice smooth long lines or curves. No furry lines:

You can use your hands as a compass (a.k.a. protractor). Those little metal thingys with the pencil in one end and the sharp point on the other that your classmate kept poking you with in elementary school.

It's easier to show in person, but look at the images below. Your wrists work just like that. As long as you hold your fingers still and don't draw past your wrist's natural range of motion, you can create a near perfect circle.
For straight lines, lift your arm off the table, and using your elbow as the the compass can help you make nice straight quick non-furry lines. It takes a bit to get the hang of it, but keep practicing. These two skills are incredibly helpful when it comes to inking and drawing well in general! No more furry lines! Unless you intentionally want them, then that's different.
Cartoon Studio / Update #4 / Oct 24th
To drive the idea of using Line Association while drawing from observation, the students practiced with reproducing an arrangements of simple shapes. To get the shapes the right size and in the right place would be challenging on its own, but using simple line associations makes it quite manageable.
In essence, the Pokemon below is nothing more than an arrangement of shapes - a bit more complicated, albeit, but shapes nonetheless.
Cartoon Studio / Update #3 / Oct 3rd
Our brains are awesome, like I mentioned before, but they are not super computers. Looking at something and then drawing it perfectly is pretty hard to do. What every beginner drawing starts out doing is picking one spot and drawing one detail after another until they finish. This usually creates nice detailed drawings that are terribly out of proportion.
The is to focus on something other than the details.
To help solve this drawing problem we started our first techniques:
Line Association
In whatever we are drawing, any two points on the object can be used to create a mental grid of where different parts of the object should be. Using these imagniary lines can help us to start sketching parts of the object in the right places
As an example, people do this when drawing faces:
Basic Shapes
Drawing the big basic shapes of an object first is the best way to start figuring out where the major parts of the object are. It doesn't matter how good one part is drawn if it is in the wrong spot and the wrong size.
Cartoon Studio / Update #2 / Sep 26th
This session we focused on the first element to drawing characters: A creative mindset
It's hard to bring a character to life unless you are engaged, creative, and having fun with all the little details that make up that character. We also looked at what strengths X has and what areas he can improve the most.
I asked him to place himself on a a spectrum, one side being really a skillful drawer and the other side being really creative. He placed himself exactly where I would have placed him:

It's not that he doesn't have any skill, its just that his strength is his creativity. We discussed and practiced using that creativity effectively, rather than just putting every silly crazy idea into one drawing. In that, we made our primary goal to increase his drawing skills so that his creativity can shine. (Yes, that is a Pac-man releasing arm on the last robot!)


Cartoon Studio / Update #1 / Sep 19th
To start the course, we discussed the main concepts.
1) Characters come from you, not drawing techniques
Your style, your humor, your imagination, your experiences, all come together to make your unique characters. It's good to learn techniques and different styles, but only as much as you are able to take it and make it your own, taking what you like and ditching the rest.
2) Techniques are only suggestions
There are many "How to" drawing books that claim if you use the techniques therein, you will be able to draw like the pros. This can be misleading. A technique comes from an individual artist's experience, and books usually only explain how to do a technique, but not why the technique is better or what the artist was focusing on while doing the technique. In CS the students will not learn just how to draw, but how to think about drawing, and many valuable techniques along the way.
(Itty bitty teeny tiny) HOMEWORK
In class X practiced tapping into his creativity and staying in a playful mindset, entertaining himself with the unique character parts he drew. X needs to draw at least 2 more parts for each (the arms, legs, body, and heads)